open-source construction

November 30, 2011

How to enable dual-screen monitor in Linux w/ Nvidia X server config.

I have shown in an earlier post that dual-monitor works great on Linux Mint 12. Dual monitor is great if you are coding, and like doing a ton of things at the same time. Although there are times when dual-monitor can be a pain in your brain.

enhanced productivity, or distraction.
The choice is yours.

Like for example when I tried to play the incredible game ZAZ”Zaz aint zaz” full-screen, it tried to take up both monitors. Although this is one of the funest games I have played in a long time. In theory you should be able to play your favorite game, in one window while browsing or chatting in another. But your mileage may seriously vary.

I often use Fire-fox in one window, and chrome in another. Or you may need to have a file browser open on one window, and a web-browser handy in another.

So here is how it is done.

STEP ONE: Install your most video drivers.

type:  “super key”

type: “additional”

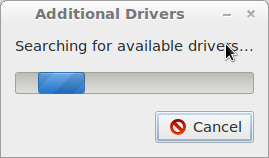
hit the enter key to open the additional drivers program.
This will box will show up briefly,
while your hardware is being checked.

In this screen-shot I had already highlighted the recommended driver, and clicked activate. After which you will be prompted to enter your password, provided you are an administrator.

After you have entered your password, the installation of the Nvidia drivers will happen. The reason my screen-shot says it is not currently in use, is you will need to reboot after the installation is complete.

STEP TWO: Configure the Nvidia X server.

Do a search for the word “nvidia”, just like you did with additional. Then strike enter to open the Nvidia X server configuration tool.

In the Left hand box make sure to check the “server Display configuration option”.

You may or may not see your secondary monitor in the layout box, like mine does. When I first opened up this box, there was only my Dell monitor showing. I had to Left-click/HOLD the monitor icon, and drag it from on top of my other monitor until they were directly side by side.

Notice the Monitor icon on the Left is highlighted, showing that it is selected. Notice that the selected monitor, is the same as the controls in the Display box.

In the resolution drop-down menu, you will need to set the resolution to auto. Also you will want to choose the monitor on the right to have the “Make this the primary display for the X screen” checked.

You may wish to choose the position of the main monitor, to the position “Left of” as the screen-shot below shows.

After you click apply you have 15 seconds to hit the OK button to keep the settings.
Notice Cancel is highlighted.
Press enter to cancel emmediately.
Press Left, then Enter to keep settings.

 You could even choose to have your monitors in a stacked array if you wish, although that would be confusing if your monitors are not physically stacked.

There is one final thing that you must do, in order to make your changes permanent.  You must click “Save to X configuration file.”

After you select save, you will be prompted to enter your password. This is due to the fact that you are changing a system configuration file. Any changes to configuration files, must be done by an administrator. Once you have done that your configuration will be permanent.

PRO-tip: If you want to know the current operating temperature of your GPU(GFX Processing Unit), you may click on “Thermal Settings”. Although that is a bit misleading, because there is nothing to set, only a chart of your current temperature as shown below.

Once this is done you will be able to move the cursor freely from one display to another. You could drag a running program to your secondary monitor, for ease of reference if you wish.

With these simple instructions you can easily double your productivity. Good luck to all of you curious geeks out there. Although don’t blame me if your games don’t work perfectly in dual-screen mode.

November 29, 2011

Linux Mint 12 review: wrap up…getting used to gnome again.

Filed under: dash, gnome 3, Google, Linux, MGSE, mint, mint 12, open-source, review, shell, software, Wikipedia, youtube — li3nuxor @ 4:30 pm
Linux Mint 12 review: wrap up…getting used to gnome again.

I am happy with the polish that the Mint developers did polishing Linux Mint 12. I enjoy having my menu back. I have found myself slowly transitioning away from the menu-bar, as I get more used to using gnome 3. Although I have noticed that tabs in the menu bar, are not universal throughout all of the work spaces. So If I have fire-fox on one work space and chrome on the other, only one tab will show up per workspace.

Mint menu expanded.

The far Left side of the mint menu directly relates to the gnome 3 Dash bar automatically.

Notice the favorite bar on the right side.

I like the fact that there are many ways you can  choose to get to your applications.

If you need to get to your clean desktop use the show desktop button,
which is directly next to the menu button.

I was slightly disappointed that the only way to search with only the keyboard, is to use the gnome shell method. Gnome shell does not seem to base their search results on how often I use a program, but the program I am looking for always shows up somewhere in the list within the first three key-strokes.

USER TIP:

Use the “super” key(aka windows key) to initiate the “activities Overview” (dark) portal.

I was expecting to want to throw gnome 3 out of a window, by the end of day 2. But I am already feeling like a gnome shell ellite user after just 3 days. I think if you approach Linux Mint 12’s new interface w/ an open-mind you will be very happy, and be able to stay on topic.

I added the canary-yellow background.
The default was plain white.

I found out that there is no longer any sarcastic ascii art animals to welcome you to the Linux terminal mode. Although I do get the same Humor from the AWN(avant window navigator) dock, through the animal farm applet.

PRO TIP:

After you initiate search, you can click one of two search tabs at the bottom of the window. These search tabs when clicked or “return”, will automatically launch a new tab in your web-browser to either Google or Wikipedia. Also if you ever need to exit the dark portal, all you need to do is to hit the “esc” key.

Below I have included a couple of youtube video’s about gnome 3.

 
FEWER INTERRUPTIONS:

messaging with gnome 3.

 
Working with Windows.

Linux Mint 12 review: pt. 3 (B) 10 things 2 do after fresh install.

Top 10 things I do after a fres install continued:

3~ Disable auto-run. This is irritating to my control freak nature.

Notice the check box, at the bottom. 

All settings button leads you back to the main settings menu which looks like this.

4~ set up any necessary user accounts, depending on your specific situation.

I set myself as the admin, and my rommate’s account to a standard user.

The plus and minus keys add/remove accounts. You must click the unlock button, as administrator to change any account settings.

Notice auto-login is switched on. I only recommend this,
with a standard user account on a Desktop PC. 

 5~ Change the Wallpaper of the back-ground. I chose the cube wallpaper. Although I really like a lot of the mountain backgrounds in Mint 12.

Notice the Dual-screen working very nicely.
I had to set this up in the Nvidia X server settings.

6~ Install Drop-box to sync my documents.

7~ mouse settings

I increased acceleration & sensativity, and checked show  position of pointer
when the control key is pressed. 

8~ set the nautilus file manager to open folders w/ a single click.

Just click the single click to open items radio button,
and the change is instantly applied.

To get to the File Management preferences go to the edit menu, and down to preferences.

9~ Make sure the Power/Screen settings are set properly for my situation.

On a laptop my main concern is power consumption, and on a Deskotp my main concern is making sure that I can watch movies from start to finish.

The default setting was to turn off after a half an hour.
I also switched the screen lock to off.
I choose Don’t suspend when inactive.
Since this is a Desktop critically low power is pointless.

~10 customize my web browser(s) to my individual needs.

In chrome this is super-simple, because I have my g-mail account linked to my browser settings. So all of my extensions, web apps, and book-marks are linked in one easy step.

In Firefox I have to manually re-install all of my extensions, theme, and most common sites I visit I sync as well. I protect my Fire-fox passwords with a Master password.

After I have synced Fire-fox on-line, I choose to sync my  fire-fox data with chrome. Then I put a similar Master password to Google chrome.

Please check out Linux Mint on Distrowatch.com for more information & download it for yourself.

Link: Linux Mint’s distrowatch page.

 I would also encourage you to go to the Linux Mint page, and create a user account so that you can help create the ratings for the software you enjoy. After all that is what has made Linux so resilient from the beginning, was peer review of the code. This gives every Linux mint user the chance to be a much needed part of the community. Microsoft or apple tell you what is good by marketing to you, but Linux Mint asks you to Learn from your peers. The Linux Mint community, also has an incredibly helpful community. My (LM) U/N is: zarr0BoogZ.

http://community.linuxmint.com/

November 25, 2011

Wanda the gnome Linux fish of wisdom

Filed under: free the fish, gnome, Linux, mintCast, OMGubuntu, open-source, Wanda, Wisdom — li3nuxor @ 6:56 pm
Today I want to talk about a nice little gnome panel applet called Wanda the fish. I was inspired by a post OMGubuntu did on a Thanksgiving day post. So I am thankful for OMGubuntu, and many other great Linux/open-source Blogs out there today.

I have noticed the Wanda the fish applet in the list of applets that you could install on a Ubuntu/Linux panels. Although the wisdom giving functionality was never built into Ubuntu out of the box. As a side-note Linux mint has always had built in mint-styled Wanda wisdom. Here is a screen shot for Wanda on Mint 11.

With Ubuntu 11.10 being based on gnome 3, I was disappointed in Losing Wanda the fish functionality. Mainly because the geek humor, that really sets Linux apart.

USER TIP:

 $ sudo apt-get install fortune-mod

will install wanda’s wisdom on Ubuntu. 

If you are still  using a gnome classic Ubuntu, like I am with my classic Ubuntu MM 11.10 you can also free Wanda the fish from her pedestal in your gnome panel.  Once Wanda is released from the bar, she will randomly swim across your screen. If you click her  while she is swimming across the screen she will quickly bolt off of the  screen.  This functionality is not built into the new gnome shell extension yet. Also to put her back in her fish-bowl, and make her stop swimming randomly across the screen; you will need to re-start your panel. You can do this by either simply logging out && back in again, re-boot the computer. If your impatient, and not afraid of typing commands killall gnome-panel to restart your window manager, to stop Wanda.  So if you are scared of the terminal, then just re-boot your box.

does this terminal really scare you?

I would encourage you that if you are an Ubuntu user that you may want to test the new menu applet “Wanda the fish”.  I will say that I have not been able to find out how to get it working from my Ubuntu 11.10 net-book. I am definitely going to install this on my desktop as well. It did take me a few minutes to figure out that I needed to:

Here I am chasing Wanda away from my media player banshee, while listening to my favourite Linux/mint pod cast minCast.

Alt. + F2 = indicator-fish

If you are like me and would like to get Wanda working on your Ubuntu desktop:

$ sudo apt-add-repository ppa:dylanmccall/indicator-fish

 then…

$ sudo apt-get update


then…

$sudo apt-get install indicator-fish


 Also check out this great OMBubuntu article for further information.

OMGubuntu: catch of the Day: Wanda the fish indicactor

Create a free website or blog at WordPress.com.